Propagation
How to Propagate a Rubber Plant
Learn how to propagate a rubber plant from stem-tip cuttings in water or soil, or by air layering, plus handling the milky sap, rooting time, and node tips.
Disclosure: The Plant Pages is reader-supported. Some pages include ads and affiliate links, and we may earn a commission from qualifying purchases, at no extra cost to you.
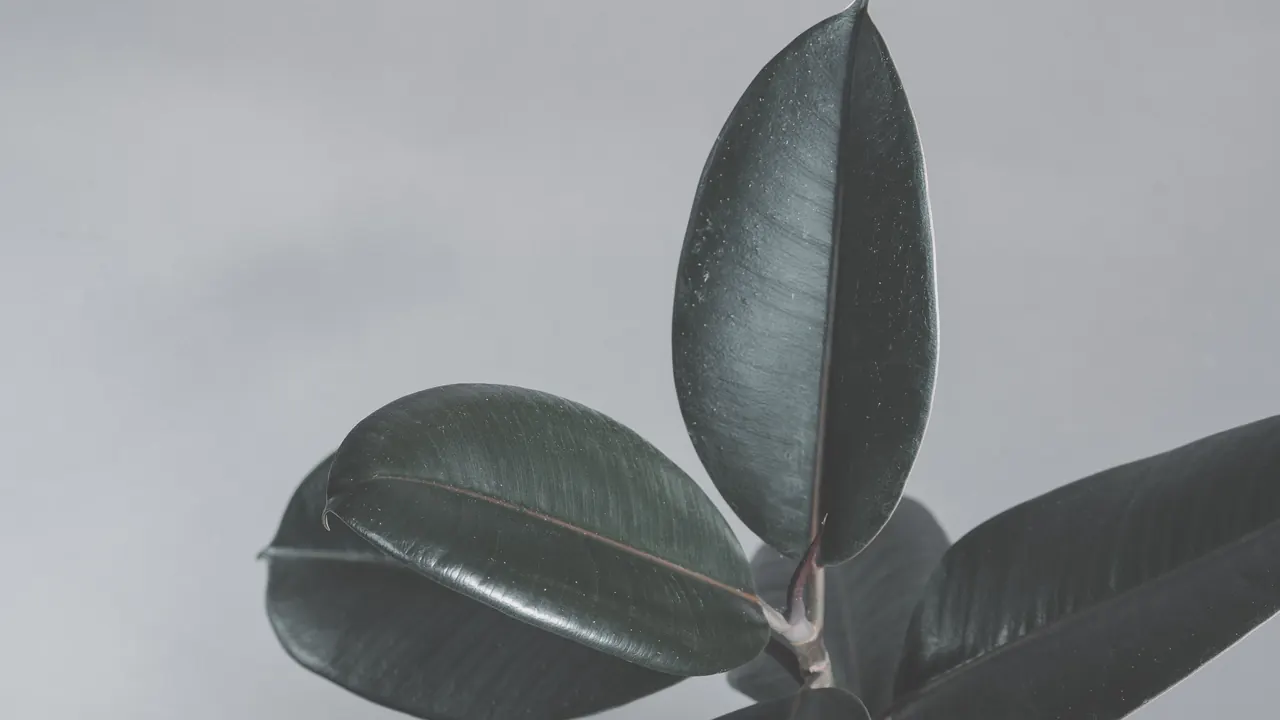
If your rubber plant has grown tall and a little bare at the bottom, or you simply want a second one for free, propagation is the answer, and it’s more forgiving than it looks. Quick answer: propagate a rubber plant (Ficus elastica) by taking a 4 to 6 inch stem-tip cutting with at least one node and a leaf or two, blotting the milky sap, and rooting it in water or moist soil where it will form roots in roughly 4 to 8 weeks; for a thick, woody plant, use air layering instead. Rooting hormone is optional and the sap is a mild irritant, so wear gloves. Below I’ll walk through every method in detail.
What you can and can’t propagate from
Before you cut anything, it helps to understand what makes a new rubber plant. The key is the node: the slightly raised bump on the stem where a leaf attaches and where a dormant bud sits. That bud is the growth point, and without it a cutting can root but will never grow into a plant.
This is why a single leaf, no matter how perfect, won’t work. Stick a lone rubber plant leaf in water and it may sprout a few roots from the cut stalk, but with no node there’s no bud to become a stem, so it sits there as a rooted leaf forever. To get a real plant you need a piece of stem with at least one node, plus a leaf or two to fuel the cutting through photosynthesis while it works on roots.
So the working unit for almost every method below is the same: a section of stem carrying one or more nodes and a small amount of leaf.
Gather your tools and pick your timing
You don’t need much: a clean, sharp knife or pruning shears, rubbing alcohol to wipe the blade, gloves, and either a glass of water or a small pot of well-draining potting mix. Optional extras are rooting hormone (powder or gel), a clear plastic bag or propagation box to hold humidity, and a chopstick for making planting holes. Sterilize the blade with the alcohol first; a dirty or crushing cut from dull shears is an easy entry point for rot and heals far more slowly than a clean slice.
Timing matters too. The best window is spring through early summer, when the plant is in active growth and cuttings root quickly and reliably. You can propagate in autumn or winter, but rooting slows down and more cuttings stall out, so if you go off-season, keep things warm and bright and be patient.
A word on the milky sap (latex)
Cut almost anywhere on a rubber plant and it weeps a white, milky sap. This is latex, the same material that gives Ficus elastica its common name, and it’s worth respecting.
The sap is a mild irritant. On skin it can cause redness or itching, it stings if it gets in your eyes, and it can upset the stomach if swallowed, so keep cuttings and trimmings away from curious pets and small children. If you have a known latex allergy, take extra care or have someone else do the cutting, because rubber plant latex can trigger a reaction.
A few simple habits keep it manageable:
- Wear gloves and avoid touching your face while you work.
- Blot the cut end of the cutting and the wound on the parent plant with a damp paper towel until the oozing slows. This protects your skin and stops the latex from sealing over the cut surface.
- Wipe up drips promptly, since dried latex is sticky and hard to remove from floors, leaves, and furniture.
- Some growers briefly rinse the cut end under cool water before rooting; that’s fine and helps the cutting take up water cleanly.
None of this is cause for alarm. Treat the sap the way you’d treat any mild household irritant.
Method 1: Stem-tip cuttings in water
Rooting in water is the most popular method because you get to watch the whole thing happen, which makes it especially satisfying for first-timers.
- Choose a healthy stem tip. Pick a length of stem that includes the growing tip, with at least one node and ideally two, plus one to three leaves. A cutting around 4 to 6 inches long is ideal.
- Make the cut. Using your sterilized blade, cut just below a node at roughly a 45-degree angle. Cutting below the node matters, because that’s where roots emerge most readily.
- Manage the sap. Blot the weeping cut end until the latex stops flowing, as described above.
- Strip the lower leaves. Remove any leaf that would sit underwater, since submerged leaves rot and foul the water. Leave the top one or two leaves in place.
- Reduce large leaves (optional). Rubber plant leaves are big, and a cutting can struggle to support them while rootless. Cutting the remaining leaves in half across the width lowers water loss and is a common trick that helps the cutting hold up.
- Place it in water. Set the cutting in a glass of room-temperature water so the node is submerged but the leaves stay dry. Put it somewhere warm with bright, indirect light, never harsh direct sun, which can cook a cutting.
- Refresh the water. Change the water every few days to keep it clean and oxygenated. Cloudy or smelly water is a sign to refresh more often.
You should see small white roots pushing from the node in about 4 to 8 weeks. Once those roots reach an inch or two long, pot the cutting up into well-draining mix.
One honest caveat: roots that form in water are adapted to water, so the move into soil is a small shock. Pot up while the roots are still fairly short, keep the new soil consistently moist for the first couple of weeks, and the cutting will grow soil-ready roots from there.
Method 2: Stem-tip cuttings in soil
Starting a cutting directly in soil skips the water-to-soil transition entirely, so the roots that form are already soil-adapted and tend to be a bit sturdier. The trade-off is that you can’t see what’s happening underground.
The first steps mirror the water method: take a 4 to 6 inch tip cutting with a node and a leaf or two, blot the sap, strip the lowest leaves, and optionally halve the remaining leaves to cut water loss.
From there:
- Apply rooting hormone (optional). If you’re using it, dip the cut end in water, then in rooting hormone powder or gel, tapping off any excess. More on whether you need this in a moment.
- Pot it up. Fill a small pot with a light, well-draining mix. A standard houseplant mix loosened with perlite works well, or a peat-or-coir-and-perlite blend. Poke a hole with a chopstick, insert the cutting so the node is buried, and firm the soil gently around it so the cutting stands on its own.
- Water and create humidity. Water lightly to settle the soil. Then cover the pot loosely with a clear plastic bag or place it in a propagation box to trap humidity, which keeps the leaves from drying out before roots can supply water. Prop the bag off the leaves with stakes so it doesn’t crush them, and crack it open for a few minutes every couple of days to let fresh air in and prevent mold.
- Place and wait. Set it in warm, bright, indirect light and keep the soil lightly moist but never soggy. Expect rooting in roughly 4 to 8 weeks.
You’ll know it has rooted when you feel gentle resistance on a light tug, or when you spot new leaf growth, which only happens once a working root system is feeding the plant. At that point, gradually remove the plastic cover over several days to acclimate the plant to normal room humidity.
Method 3: Air layering for tall or woody plants
Air layering is the method to reach for when your rubber plant has become a tall, single, leggy stem and you want a fuller plant without gambling on a thick, woody cutting that may be slow to root. Instead of detaching a piece and hoping it survives, you encourage roots to form on the stem while it’s still attached and fed by the parent, which dramatically improves your odds with mature growth.
Here’s the process:
- Pick a spot. Choose a point on the main stem below the leafy top, ideally where you’d like the new plant’s base to be. Just below a node is the spot to wound.
- Wound the stem. With a sterilized knife, make an upward-angled cut about a third of the way through the stem, or remove a narrow ring of the outer bark around the stem. Blot the latex that wells up. To hold an angled cut open, wedge a toothpick or a small ball of moss into the gap so it can’t reseal.
- Add hormone (optional). Dust the wounded area with a little rooting hormone if you’d like a nudge.
- Wrap in moist moss. Take a generous handful of damp sphagnum moss (wrung out so it’s moist, not dripping) and pack it around the wound, fully covering it.
- Seal it up. Wrap the moss ball in clear plastic and tie it snugly above and below with twine or twist ties so it stays put and holds moisture. Clear plastic lets you see roots when they appear.
- Keep it moist. Over the following weeks, check that the moss stays damp. If it dries, open the top, add a little water, and reseal.
Roots growing into the moss take longer than a cutting, often a couple of months, so patience pays. When you can see a healthy network of roots filling the moss, cut the stem off just below the new root ball, unwrap it carefully without tearing the roots, and pot the rooted top up in well-draining mix. The parent stem, now shorter, will usually push new branches from below the cut, so you end up with two fuller plants.
Rooting hormone: do you actually need it?
Short answer: no. Rubber plants are among the easier houseplants to root, and plenty of cuttings take off in plain water or soil with no help at all.
That said, rooting hormone (a synthetic version of the auxins plants use to trigger root growth) can tilt the odds in your favor and is most worth using on the harder cases: older, woodier cuttings, off-season attempts, and air layering on thick stems. If you have some on hand, a quick dip costs nothing. If you don’t, don’t let its absence stop you from propagating today.
Aftercare for a newly rooted cutting
The first few weeks after potting are when a new rubber plant is most fragile. Keep the fresh potting mix lightly and evenly moist while the young roots establish, then shift to the normal rubber plant rhythm of letting the top inch or two of soil dry between waterings. Give it bright, indirect light and steady warmth, and keep it away from cold drafts and the hot, dry blast of heating or AC vents. Hold off on fertilizer for about a month; tender new roots are easily burned, and the cutting has enough stored energy to get started. Once you see new leaves unfurling, your propagation worked, and you can treat the plant as a normal, if small, rubber plant.
Common problems and quick fixes
Most propagation failures trace back to a handful of causes, and the symptom usually tells you which.
The cutting wilts or the leaves droop. This is normal in the first days, as a rootless cutting loses more water than it can take up. Higher humidity helps, which is why the plastic-bag tent and halving large leaves are worth doing. Persistent, worsening wilt can mean the stem is rotting, so check the cut end.
The stem goes mushy, dark, or smelly. That’s rot, usually from a contaminated cut, dirty water left too long, or waterlogged soil. Trim back to firm, healthy tissue above the rotted part, blot the fresh cut, refresh the water or start in clean soil, and try again with a sterilized blade.
Roots form in water but the cutting struggles after potting. Water roots need a transition. Pot up while roots are short, keep the soil consistently moist at first, and the plant will grow soil-suited roots. Avoid leaving a cutting in water for months; the longer the water roots, the harder the switch.
Nothing happens for a long time. Cold and low light slow rooting to a crawl. Move the cutting somewhere warmer and brighter (still indirect), be patient through the 4 to 8 week window, and resist pulling it out to check, which damages the delicate new roots.
Going further with propagation
Once you’ve propagated a rubber plant, the same core idea (find a node, take a clean cutting, give it warmth and humidity) carries over to most foliage houseplants, though the details shift by species. Two good next projects are learning how to propagate a snake plant, which roots from leaf sections in a way nothing on the rubber plant prepares you for, and how to propagate a Christmas cactus, where letting the cutting callus before planting is the whole trick.
The bottom line: take a stem-tip cutting with a node and a leaf or two, manage the milky sap with gloves and a blot, root it in water or soil over 4 to 8 weeks, and reach for air layering when the plant is too tall and woody to cut. Skip the rooting hormone if you don’t have it, keep your new plant warm, bright, and lightly moist, and you’ll turn one rubber plant into many.